在使用5+SDK进行iOS开发的过程中,不时有一些需求需要编写原生插件来实现,比如经典蓝牙、物联网原生SDK、各大平台的原生SDK功能等,这些DCLOUD的云端打包就无法实现了,现在uni-app也可以编写原生插件,然后上架到dcloud的市场供大家使用,这是另一个话题。
飘易今天要说的是如何在 iOS 里面集成 5+SDK 离线包并且编写自定义插件(不使用uni-app)。
mac OSX 和 xcode 先升级到最新版本;如果你不做这一步,开发的过程中可能会遇到各种问题,最后开发的结果可能还不支持最新版本的iOS,到时候还是需要升级系统和xcode。因此,磨刀不误砍柴工,先升级系统吧,好在苹果的系统升级不需要我们太操心。
首先,我们需要下载 5+ SDK 下载 iOS 版本,下载地址:https://ask.dcloud.net.cn/article/103
解压后得到以下几个目录:
1、5+app-uniplugin-demo这个目录的作用:
在uni-app中开发5+插件,详细请看目录里的 .md文件
2、HBuilder-Hello这个目录的作用(重点):
5+app、uni-app离线打包示例(注意:如果是uni-app项目且为自定义组件模式时,请查看这个地址(https://ask.dcloud.net.cn/article/35871)来进行配置)
3、HBuilder-Integrate这个目录的作用:
5+规范的原生插件开发工程,注意这个里面的工程不是打包工程
4、HBuilder-uniPluginDemo这个目录的作用:
uni-app的原生插件开发工程,支持weex插件,,注意这个里面的工程不是打包工程
5、Feature-iOS.xls这个文件的作用:
这个文件是 HBuilder-Hello目录里打包工程的依赖关系
6、SDK这个目录的作用:
这个里面是工程需要的库文件,.h头文件,配置文件,资源文件
我们需要留意的 HBuilder-Hello 这个目录,为了不影响sdk的原始目录,飘易建议大家单独新建一个目录,比如 xx项目/project,把 HBuilder-Hello 和 SDK 这2个目录(保持同级关系,他们之间有引用依赖)同时复制到新的 project 目录里。
下面就是 进入新目录 project/HBuilder-Hello 的工作了。
一般我们开发插件,需要依赖 cocoapods 的方式安装。
IOS的SDK 采用 cocoapods 管理依赖,建议采用 1.1.1 以上版本,SDK 的集成请参考以下步骤:
终端命令窗口里,cd到项目根目录里(有 xx.xcodeproj 文件),然后执行
pod init
然后进入项目总路径下,会看到多了一个podfile文件,编辑这个文本文件,添加你需要的pod依赖。
podfile文件示例如下:
# SDK 最低支持版本为 iOS 8.0
platform:ios, '8.0'
# 需要替换下述 "IMSDemoApp" 为开发者 App 的 target 名称
target "IMSDemoApp" do
    pod 'AlicloudALBBOpenAccount', '3.4.0.30'
    pod 'IMSApiClient', '1.2.0'
    pod 'IMSAuthentication', '1.1.0'
    pod 'IMSBreezeSDK', '1.4.0'
    pod 'IMSBoneKit', '1.2.6'
end
修改完podfile配置文件之后,在终端里面接着执行一句命令:
pod install
等待一段时间,执行完之后,会提示安装成功的信息。
进入到你的项目目录下,项目里面会多了好几个文件,生成的重要文件Podfile.lock是用来记录着上一次下载的框架版本,包括后缀为.xcworkspace的文件。
那么就大功告成,然后重启Xcode,再重新打开你的项目,记着不是点击 xx.xcodeproj,而是点击 xx.xcworkspace 这个文件。
关于cocoapods管理依赖,可参考:https://blog.csdn.net/cc1991_/article/details/76686991
[!] The `HBuilder [Debug]` target overrides the `GCC_PREPROCESSOR_DEFINITIONS` build setting defined in `Pods/Target Support Files/Pods-HBuilder/Pods-HBuilder.debug.xcconfig'. This can lead to problems with the CocoaPods installation
    - Use the `$(inherited)` flag, or
    - Remove the build settings from the target.
[!] The `HBuilder [Debug]` target overrides the `LIBRARY_SEARCH_PATHS` build setting defined in `Pods/Target Support Files/Pods-HBuilder/Pods-HBuilder.debug.xcconfig'. This can lead to problems with the CocoaPods installation
    - Use the `$(inherited)` flag, or
    - Remove the build settings from the target.
[!] The `HBuilder [Debug]` target overrides the `OTHER_LDFLAGS` build setting defined in `Pods/Target Support Files/Pods-HBuilder/Pods-HBuilder.debug.xcconfig'. This can lead to problems with the CocoaPods installation
    - Use the `$(inherited)` flag, or
    - Remove the build settings from the target.
[!] The `HBuilder [Release]` target overrides the `GCC_PREPROCESSOR_DEFINITIONS` build setting defined in `Pods/Target Support Files/Pods-HBuilder/Pods-HBuilder.release.xcconfig'. This can lead to problems with the CocoaPods installation
    - Use the `$(inherited)` flag, or
    - Remove the build settings from the target.
[!] The `HBuilder [Release]` target overrides the `LIBRARY_SEARCH_PATHS` build setting defined in `Pods/Target Support Files/Pods-HBuilder/Pods-HBuilder.release.xcconfig'. This can lead to problems with the CocoaPods installation
    - Use the `$(inherited)` flag, or
    - Remove the build settings from the target.
[!] The `HBuilder [Release]` target overrides the `OTHER_LDFLAGS` build setting defined in `Pods/Target Support Files/Pods-HBuilder/Pods-HBuilder.release.xcconfig'. This can lead to problems with the CocoaPods installation
    - Use the `$(inherited)` flag, or
    - Remove the build settings from the target.
这种警告是不能忽视的,它带来的直接后果就是无法通过编译。
* 项目 Build Settings - Other Linker Flags 里,增加 $(inherited),如果原来有 -ObjC ,不要删除,保留,如果删除会出错。
* 项目 Build Settings - Library Search Paths 里,增加 $(inherited)
* 项目 Build Settings - Preprocessor Macros 里,增加 $(inherited)
然后执行
pod update
更新pod资源。
先跟着Dcloud的教程一阵操作猛如虎各种配置图标、名称、版本号等,先把工程跑起来。
参考地址:https://ask.dcloud.net.cn/article/41
这一步教程里已经有比较详细的操作了,飘易就不细述了。
可以直接从 HBuilder-Integrate 目录里复制 PluginTest.h \ PluginTest.m 这2个示例文件到新项目里。
我们一般使用异步的方法调用插件,因此,编写插件也基于异步的方法。
PluginTest.h文件内容:
#include "PGPlugin.h"
#include "PGMethod.h"
#import <Foundation/Foundation.h>
@interface PGPluginTest : PGPlugin
- (void)PluginTestFunction:(PGMethod*)command;
- (void)PluginTestFunctionArrayArgu:(PGMethod*)command;
@end
PluginTest.m文件内容:
#import "PluginTest.h"
#import "PDRCoreAppFrame.h"
#import "H5WEEngineExport.h"
#import "PDRToolSystemEx.h"
// 扩展插件中需要引入需要的系统库
#import <LocalAuthentication/LocalAuthentication.h>

// 这里可以引入一些第三方的依赖头文件
//....

// 这里可以定义一些变量
//.....

@implementation PGPluginTest


#pragma mark 这个方法在使用WebApp方式集成时触发,WebView集成方式不触发

/*
 * WebApp启动时触发
 * 需要在PandoraApi.bundle/feature.plist/注册插件里添加autostart值为true,global项的值设置为true
 */
- (void) onAppStarted:(NSDictionary*)options{

    NSLog(@"5+ WebApp启动时触发");
    // 可以在这个方法里向Core注册扩展插件的JS

}

// 监听基座事件事件
// 应用退出时触发
- (void) onAppTerminate{
    //
    NSLog(@"APPDelegate applicationWillTerminate 事件触发时触发");
}

// 应用进入后台时触发
- (void) onAppEnterBackground{
    //
    NSLog(@"APPDelegate applicationDidEnterBackground 事件触发时触发");
}

// 应用进入前天时触发
- (void) onAppEnterForeground{
    //
    NSLog(@"APPDelegate applicationWillEnterForeground 事件触发时触发");
}


#pragma mark 以下为插件方法,由JS触发, WebView集成和WebApp集成都可以触发

- (void)PluginTestFunction:(PGMethod*)commands
{
	if ( commands ) {
        // CallBackid 异步方法的回调id,H5+ 会根据回调ID通知JS层运行结果成功或者失败
        NSString* cbId = [commands.arguments objectAtIndex:0];

        // 用户的参数会在第二个参数传回
        NSString* pArgument1 = [commands.arguments objectAtIndex:1];
        NSString* pArgument2 = [commands.arguments objectAtIndex:2];
        NSString* pArgument3 = [commands.arguments objectAtIndex:3];
        NSString* pArgument4 = [commands.arguments objectAtIndex:4];

        // 如果使用Array方式传递参数
        NSArray* pResultString = [NSArray arrayWithObjects:pArgument1, pArgument2, pArgument3, pArgument4, nil];

        // 运行Native代码结果和预期相同,调用回调通知JS层运行成功并返回结果
        // PDRCommandStatusOK 表示触发JS层成功回调方法
        // PDRCommandStatusError 表示触发JS层错误回调方法

        // 如果方法需要持续触发页面回调,可以通过修改 PDRPluginResult 对象的keepCallback 属性值来表示当前是否可重复回调, true 表示可以重复回调   false 表示不可重复回调  默认值为false

        PDRPluginResult *result = [PDRPluginResult resultWithStatus:PDRCommandStatusOK messageAsArray: pResultString];

        // 如果Native代码运行结果和预期不同,需要通过回调通知JS层出现错误,并返回错误提示
        //PDRPluginResult *result = [PDRPluginResult resultWithStatus:PDRCommandStatusError messageAsString:@"惨了! 出错了! 咋(wu)整(liao)"];

        // 通知JS层Native层运行结果
        [self toCallback:cbId withReslut:[result toJSONString]];
    }
}

- (void)PluginTestFunctionArrayArgu:(PGMethod*)commands
{
    // CallBackid 异步方法的回调id,H5+ 会根据回调ID通知JS层运行结果成功或者失败
    NSString* cbId = [commands.arguments objectAtIndex:0];

    // 用户的参数会在第二个参数传回,可以按照Array方式传入,
    NSArray* pArray = [commands.arguments objectAtIndex:1];

    // 如果使用Array方式传递参数
    NSString* pResultString = [NSString stringWithFormat:@"%@ %@ %@ %@",[pArray objectAtIndex:0], [pArray objectAtIndex:1], [pArray objectAtIndex:2], [pArray objectAtIndex:3]];

    // 运行Native代码结果和预期相同,调用回调通知JS层运行成功并返回结果
    PDRPluginResult *result = [PDRPluginResult resultWithStatus:PDRCommandStatusOK messageAsString:pResultString];

    // 如果Native代码运行结果和预期不同,需要通过回调通知JS层出现错误,并返回错误提示
    //PDRPluginResult *result = [PDRPluginResult resultWithStatus:PDRCommandStatusError messageAsString:@"惨了! 出错了! 咋(wu)整(liao)"];

    // 通知JS层Native层运行结果
    [self toCallback:cbId withReslut:[result toJSONString]];
}

@end开发者在实现JS层API时首先要定义一个插件类别名,并需要在IOS工程的 PandoraApi.bundle\feature.plist 文件中声明插件类别名和Native层扩展插件类的对应关系:

比如上面的这个图里,plugintest 是给JS使用的插件别名,PGPluginTest 是对应iOS原生的类名称。
JS代码封装:
document.addEventListener( "plusready",  function()
{
    // 声明的JS“扩展插件别名”
    var _BARCODE = 'plugintest',  B = window.plus.bridge;
    var plugintest =
    {
        // 声明异步返回方法
        PluginTestFunction : function (Argus1, Argus2, Argus3, Argus4, successCallback, errorCallback )
        {
            var success = typeof successCallback !== 'function' ? null : function(args)
            {
                successCallback(args);
            },
            fail = typeof errorCallback !== 'function' ? null : function(code)
            {
                errorCallback(code);
            };
            callbackID = B.callbackId(success, fail);
            // 通知Native层plugintest扩展插件运行”PluginTestFunction”方法
            return B.exec(_BARCODE, "PluginTestFunction", [callbackID, Argus1, Argus2, Argus3, Argus4]);
        },
        PluginTestFunctionArrayArgu : function (Argus, successCallback, errorCallback )
        {
            var success = typeof successCallback !== 'function' ? null : function(args)
            {
                successCallback(args);
            },
            fail = typeof errorCallback !== 'function' ? null : function(code)
            {
                errorCallback(code);
            };
            callbackID = B.callbackId(success, fail);
            return B.exec(_BARCODE, "PluginTestFunctionArrayArgu", [callbackID, Argus]);
        }
    };
    window.plus.plugintest = plugintest;
}, true );
html 代码使用示例:
<script type="text/javascript">
        function pluginShow() {
            plus.plugintest.PluginTestFunction("Html5","Plus","AsyncFunction","MultiArgument!", function( result ) {alert( result[0]  + "_" + result[1]  + "_" + result[2]  + "_" + result[3] );},function(result){alert(result)});
        }

        function pluginShowArrayArgu() {
            plus.plugintest.PluginTestFunctionArrayArgu( ["Html5","Plus","AsyncFunction","ArrayArgument!"], function( result ) {alert( result );},function(result){alert(result)});
        }
</script>

<div class="button" onclick="pluginShow()">PluginTestFunction()</div>
<div class="button" onclick="pluginShowArrayArgu()">PluginTestFunctionArrayArgu()</div>文档参考:https://ask.dcloud.net.cn/article/67
HBuilder-Hello 工程里包含了很多的sdk,如果原封不动的打包成ipa,我们会发现这个文件有近乎 50M 左右大小,很显然,里面有一些我们用不到的依赖,可以删除以减少打包体积 。
在“Feature-iOS.xls”文件中查找不使用模块对应的 库,包括 xx.a,xx.framework, xx,bundle,从列表中删除。
如不使用“相机模块”,则可选中“liblibCamera.a”、按退格键删除,按option键可以多选。
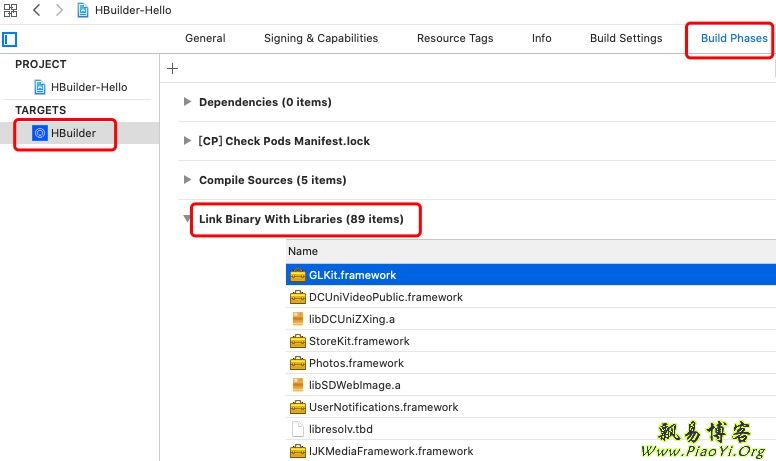
位置为 targets - Build Phases - Link Binary With Libraries 和 Copy Bundle Resources 里面:

删除了一些不需要的库之后,我们再打包会发现体积变小了。
XCODE开发插件的过程中,建议大家手动管理证书。在苹果开发者中心网站里:
【appid】:
只设置一个,不区分开发和发布。
【证书】:
分别生成2个证书,一个是开发证书,另一个是发布证书。
证书不需要每次都生成,生成一次,以后其他的app开发时可以复用的。
【描述文件】分3个:
开发描述文件 - 使用开发证书,用于内部开发人员测试app使用,仅允许添加了udid的设备;
ADHOC描述文件(可选) - 使用发布证书,用于分发给外部测试人员比如客户,仅允许添加了udid的设备;
发布描述文件 - 使用发布证书,上架 app store 使用。
描述文件,每个app都不同,需要单独生成。
xcode签名示例:
Signing & Capabilities 里设置(不要勾选 Automatically manage signing ):
Signing(Debug) 导入开发描述文件;
Signing(Release) 导入发布描述文件。

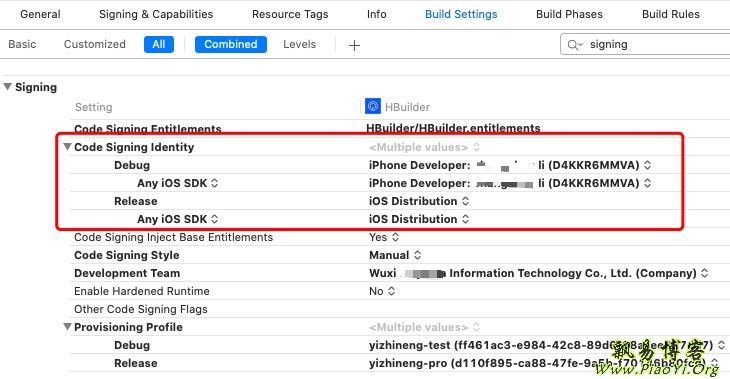
同时还有一个地方要设置,不然xcode自动匹配的很有可能就是错的,
Build Settings里设置:
Code Signing Identity 里分别设置 Debug 和 Release 使用的开发者证书。

汇总一些错误。
$ pod init
-bash: /usr/local/bin/pod: /System/Library/Frameworks/Ruby.framework/Versions/2.3/usr/bin/ruby: bad interpreter: No such file or directory
解决:
当Mac升级版本的时候 会出现以上问题
(1)首先执行如下命令查看所有 gem 源,检查是否是最新的:
gem sources -l
注意,如果你不是使用的ruby-china的镜像,比如像我的是 https://rubygems.org/,就不需要更新,直接跳到第5步,升级 CocoaPods 即可。
(2)由于 RubyGems 镜像服务域名变更(后缀由之前的 org 改成 com),我们先执行如下命令将当前的 gem 源删除:
gem sources --remove https://gems.ruby-china.org/
(3)然后在执行如下命令添加新的 gem 源:
gem sources -a https://gems.ruby-china.com
(4)接着执行如下命令更新 gem
sudo gem update --system
(5)接着执行如下命令升级 CocoaPods【重要】
sudo gem install -n /usr/local/bin cocoapods --pre
(6)接着执行如下命令更新本地仓库
pod repo update
(7)最后再次执行 pod install 命令会发现不再报错了。
参考:https://www.hangge.com/blog/cache/detail_2230.html
Undefined symbols for architecture arm64:
  "_OBJC_CLASS_$_SKStoreProductViewController", referenced from:
      objc-class-ref in liblibPDRCore.a(DCH5ScreenAdvertising.o)
  "_SKStoreProductParameterITunesItemIdentifier", referenced from:
      -[DCH5ScreenAdvertising touchesEnded:withEvent:] in liblibPDRCore.a(DCH5ScreenAdvertising.o)
ld: symbol(s) not found for architecture arm64
clang: error: linker command failed with exit code 1 (use -v to see invocation)
解决:
缺少系统库文件,位置:项目targets - Build Phases - Link Binary With Libraries 里面需要增加2个系统库:
Photos.framework
StoreKit.framework
精简依赖库的过程中如果提示:
Undefined symbols for architecture arm64:
  "_OBJC_METACLASS_$_GLKView", referenced from:
      _OBJC_METACLASS_$_MAMapRender in MAMapKit(MAMapKit-arm64-master.o)
  "_OBJC_CLASS_$_GLKView", referenced from:
      _OBJC_CLASS_$_MAMapRender in MAMapKit(MAMapKit-arm64-master.o)
  "_GLKMatrix4Identity", referenced from:
      -[MASpriteOverlayRenderer doRenderContent] in MAMapKit(MAMapKit-arm64-master.o)
      -[MAObjModelOverlayRenderer glRender] in MAMapKit(MAMapKit-arm64-master.o)
意思就是 MAMapKit 依赖了 GLKView ,找不到这个库,我们知道GLKView需要一个GLKit的库来支持;问题就简单了,直接把GLKit.framework添加进来就可以了!
遇到类似问题,都这样解决。
objc[93108]: Class MPRequest is implemented in both /System/Library/Frameworks/MediaPlayer.framework/MediaPlayer (0x1fa002b00) and /private/var/containers/Bundle/Application/097442D8-ECF0-4D9C-9879-A77861C3E7D2/易智能.app/易智能 (0x100ec0d90). One of the two will be used. Which one is undefined.
2020-03-20 15:19:26.011207+0800 易智能[93108:8423000] -[__NSCFString JSONValue]: unrecognized selector sent to instance 0x2833bb6c0
2020-03-20 15:19:26.013538+0800 易智能[93108:8423000] *** Terminating app due to uncaught exception 'NSInvalidArgumentException', reason: '-[__NSCFString JSONValue]: unrecognized selector sent to instance 0x2833bb6c0'
*** First throw call stack:
(0x1b37c2a48 0x1b34e9fa4 0x1b36c65a8 ... 0x1b35c4360)
libc++abi.dylib: terminating with uncaught exception of type NSException
uncaught exception NSInvalidArgumentException __NSCFString JSONValue解决pod依赖的过程中
项目 targets - Build Settings - Other Linker Flags 里,增加 $(inherited),如果原来有 -ObjC ,不要删除,保留。
系统 mac Catalina xcode版本11.3 iOS 13.3运行的时候会出现 [Process] kill() returned unexpected error 1
以及经常被Thread 10: breakpoint意外的断点 ,但是不影响程序的正常运行。
大致原因是新版的CatAlina对于WKWebview不友好,没有对它进行优化具体请查看
鸡肋解决方案:Product > Scheme > Edit Scheme 在 Environment Variables 中添加
OS_ACTIVITY_MODE = disable
这个只是屏蔽到日志并不会彻底解决这个问题。
这是webkit错误,下一个iOS测试版应该修复它:
https://bugs.webkit.org/show_bug.cgi?id=202173
https://www.mail-archive.com/webkit-changes@lists.webkit.org/msg146193.html
问题:
比如需要把状态栏设置成白色背景,黑色文字:
项目 - 属性 - info 里设置:
StatusBarBackground 设为 #FFFFFF (背景色设为白色)
Status bar style 设为 Dark Content (文字设为黑色)
View controller-based status bar appearance 设为 NO
Status bar is initially hidden 设为 NO (YES为启动时全屏,如果设为YES时,IOS13下文字颜色一直是白色,无法修改)
iOS11以上系统当启用沉浸式式状态栏后,webview默认会调整内容至安全区域之内。如果不需要自动调整可以在meta(name="viewport")节点的content属性值中添加viewport-fit=cover :
<meta name="viewport" content="width=device-width, initial-scale=1.0, maximum-scale=1.0, user-scalable=0, viewport-fit=cover" />
完。